
How does it work?
Peak Design’s Capture Clip v3 is essentially two main parts; a base that you clamp on to your backpack strap (or belt) and a plate that you screw into your camera’s tripod thread. The plate then slots into the base and can only be released with the push of a button using just one hand.
The plate slides into position in all four directions. This means you can hang a heavy long lens ‘point down’, or if you have a small lens you can hang the camera sideways to reduce any bouncing around. It’s very easy to find the slot without much effort, and it’s simple to release.
It’s metal – aluminium – and is lightweight and doesn’t rust. A black anodised finish gives it a discreet look. After two years of fairly frequent use, my original Capture Clip shows minor cosmetic scratches with no rust. It functions as perfectly as when it was first bought, except that I lost the camera piece somewhere on the top of Mt Oxford…
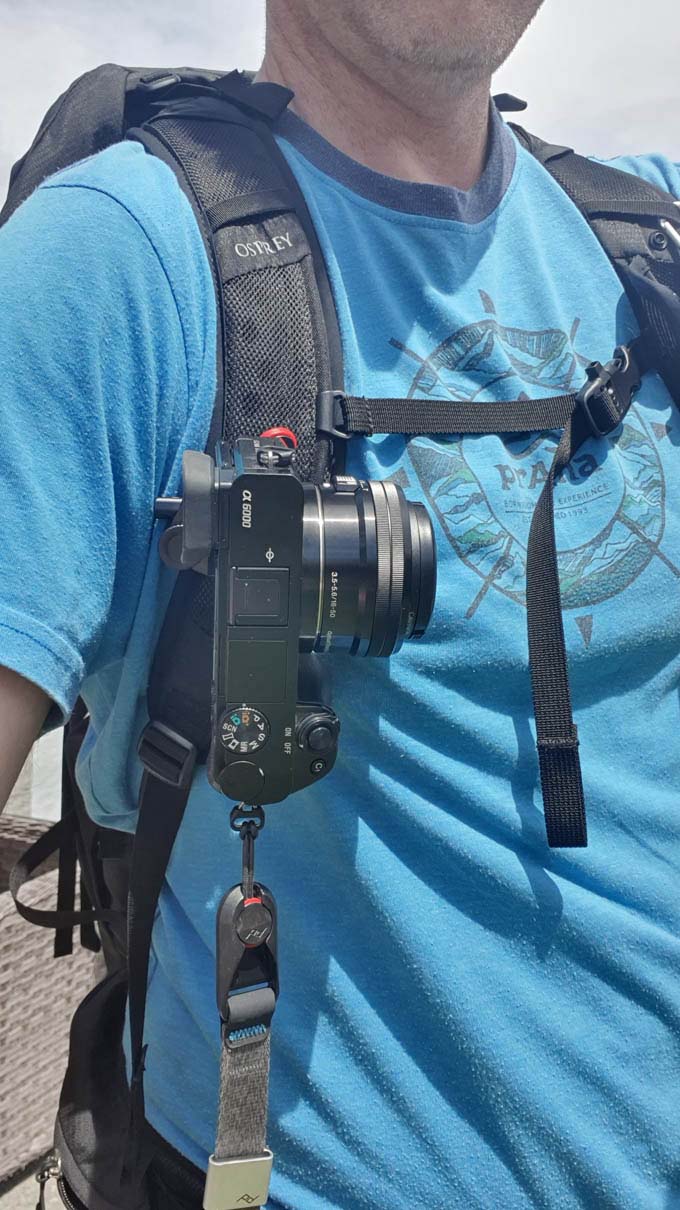
Camera placed in the clip with lens pointing sideways.
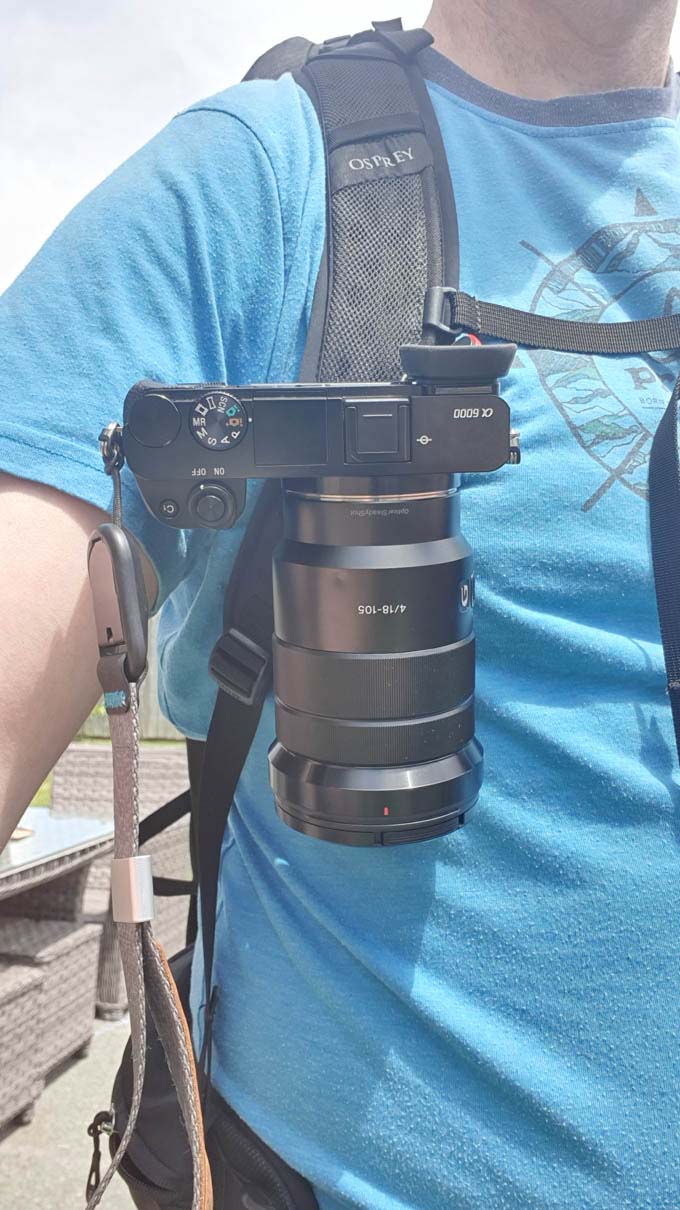
Camera placed in the clip with lens pointing down.

What’s in the box?!*
Like any Peak Design product that I’ve bought, the Capture Clip v3 comes well packaged using minimal plastic. The box contains:
- 1 x Capture Clip base
- 1 x Standard Plate (this is what Peak Design call the ‘New Standard Plate’ on their compatibility chart but also referred to as PL-S-3 Standard Plate on some retailer sites).
- 2 x thumb screw bolts
- 2 x hex drive long bolts (about 2mm longer than the above)
- 1 x 4mm hex wrench (allen key)
- 1 x microfibre pouch
- 1 x Peak Design sticker
*See the movie Seven for the reason I aded the exclamation mark. Yes, I’m a geek.

The Capture Clip with thumb and hex screws.

My older clip showing two years of regular use.

The Capture Clip Standard Plate
So I was on the summit of Mt Oxford in Canterbury and decided I wanted to take some shots using my small Manfrotto tripod. This tripod doesn’t have a plate fitting, just a screw on a circular pad, so I had to remove the plate from my camera in order to screw the camera onto the tripod. Then I lost the plate. It could be in that photograph somewhere.
When I got home and looked for a replacement plate, I mistakenly thought I had the v2 model of the Capture Clip and so was looking for an older compatible plate. I didn’t find anything that would work the same way so I decided to spend the extra money and replace the whole clip. At least I’d have the new model, I thought. When it arrived it all looked very familiar so I dug out the old box and realised I’d always had the v3 and could have just bought a replacement plate from the likes of Auckland Camera Centre, Photogear, or Rubber Monkey. Oh well. At least now I can leave my old base on one backpack and my new base on another backpack and easily swap the camera between the two. I should have watched Peak Design’s video first – at this point it explains the different plates.
I’m telling this story because it shows one minor niggle with the Capture Clip. If your tripod isn’t compatible, like my smaller tripods, then you’ll need to remove the plate from your camera using the allen key. This can be a minor nuisance and leaves the plate at risk of being lost on a mountain if you’re a numpty like me. Still, there are some tripods that do work with the plate in place, as well as some alternative plates and adapters for various uses.
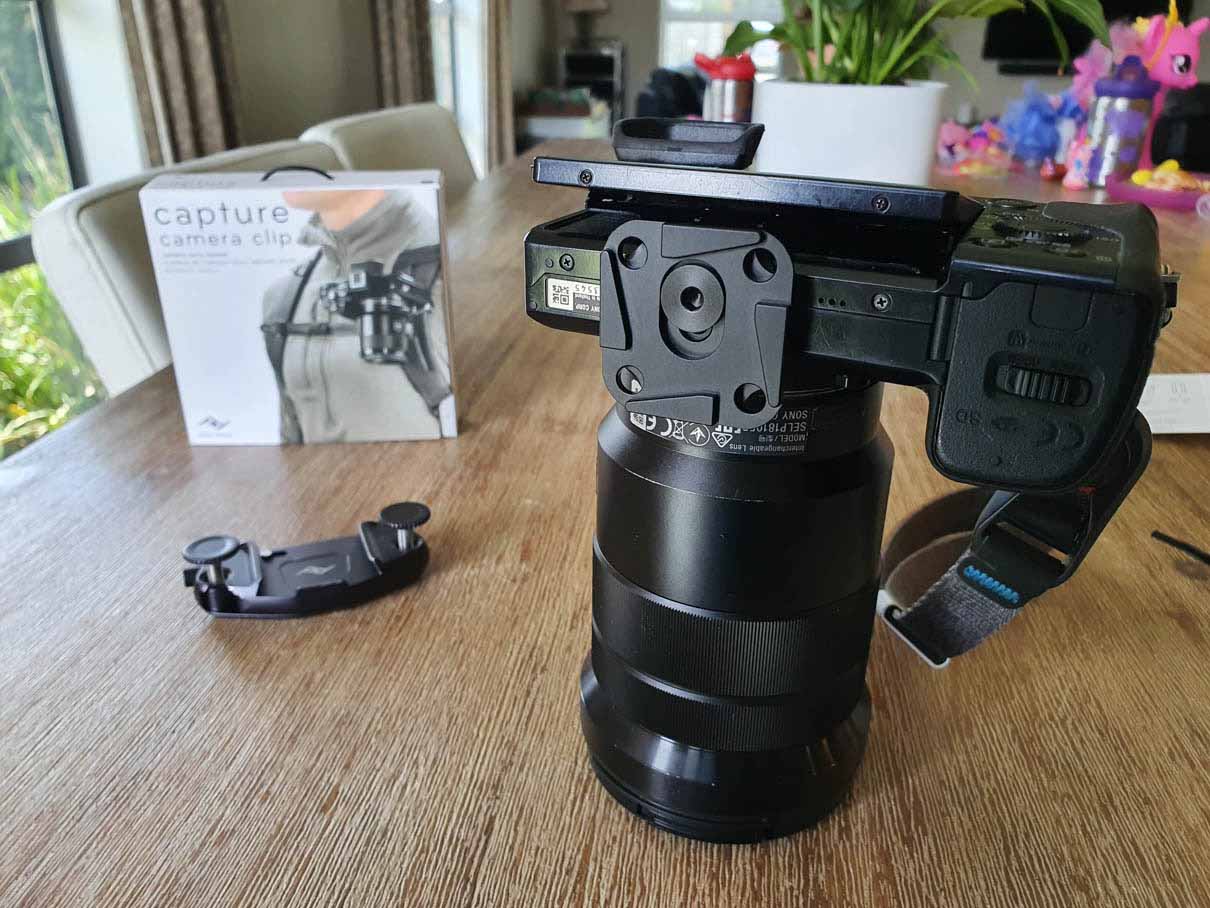
As it stands, the Standard Plate is a quality bit of engineering that allows the camera to be inserted into the base in four directions. The screw ‘hole’ is more of a ‘slot’ that means you can position the plate off-centre. As you can see from the photo above this means I can position the plate in a way that allows my screen to tilt freely. It could also help allow you to keep the battery compartment clear on other cameras.
There are four corner holes that you can attach a strap attachment to. I’ve attached mine so that I remember to hook it on a carabiner on my pack next time I remove it. As you can see from the photos below, the plate still slips into the base perfectly fine in both directions even with the strap attachment in place. This attachment can also form one of the two attachments needed for your shoulder strap, allowing the camera to hang in a more efficient way than the regular two attachment points on the camera.

Capture Clip attached to the plate with a strap attachment on this way.

Capture Clip attached to the plate with a strap attachment on that way.

What does the Capture Clip fit?
Peak Design say the clip fits any strap up to 6.4cm (2.5″) wide and 1.5cm (0.6″) thick with the standard thumbscrews, or 2.2cm (0.88″) thick with the included hex bolts.
My Osprey Talon 44 backpack has fairly wide and thick straps and the clip still fits nicely with room to spare, even on the angle which I attach it at to help the camera sit more comfortably.

What else should I know before I buy?
As well as on your backpack, you can also use the clip on your belt. This could be really handy in a studio or at weddings.
If you’re like me, you’ll just leave the plate on the camera for 90% of the time. Just note that this means it won’t sit flat on a surface any more.
The quick release button sits on the right side of the clip, imagining that you’re wearing a rucksack and are looking down at the clip. I’ve used it on both straps and find that I don’t have too many issues releasing it with one hand regardless of which strap it’s on, but it’s much easier when the button is on the inside of your body rather than pointing at your armpit. Still, I’m restricted with my Osprey Talon 44 backpack as the left strap has an inbuilt pocket which gets in the way.
While it comes with hex threads as well as thumb screw threads, I find the latter preferable as I like the idea of being able to remove the base whenever I want without the use of tools. Having said that, I have found that I need to check and tighten the screws occasionally. I’ve never felt like I was at risk of the base falling off, though.
It can be a good idea to remove the camera from your strap before taking off your backpack. I’ve nearly knocked the camera into a rock or two after forgetting that it was on there when moving my backpack around.
In summary…
The Capture Clip is a must buy, especially for people who like to take their camera while hiking. A number of outdoor photographers that I follow on YouTube can be spotted wearing their Capture Clips, and Peak Design is the original and respected brand to buy your clip from.
The clip is a little pricey, but I’d rather pay the money knowing that I have a quality clip protecting my camera from falling, and that my money is going to a company with a good brand ethos and a concern for the environment; they’re climate neutral certified along with a variety of other initiatives.
I use and love this clip so much that when I lost the plate last weekend the first thing I did when I got home was buy a replacement.
Similar Posts
 https://nzraw.co.nz/wp-content/uploads/2023/06/picture-takashima-jacket-review-new-zealand.jpg
908
1210
Mark
https://nzraw.co.nz/wp-content/uploads/2020/06/nz-raw-logo.png
Mark2023-06-30 08:57:142023-06-30 08:57:14Review of the Picture Takashima Jacket
https://nzraw.co.nz/wp-content/uploads/2023/06/picture-takashima-jacket-review-new-zealand.jpg
908
1210
Mark
https://nzraw.co.nz/wp-content/uploads/2020/06/nz-raw-logo.png
Mark2023-06-30 08:57:142023-06-30 08:57:14Review of the Picture Takashima Jacket https://nzraw.co.nz/wp-content/uploads/2022/04/garmin-66i-gps-showing-map.jpg
806
1210
Mark
https://nzraw.co.nz/wp-content/uploads/2020/06/nz-raw-logo.png
Mark2022-04-23 16:15:202023-06-28 13:41:39Why I chose a Garmin 66i inReach GPS device
https://nzraw.co.nz/wp-content/uploads/2022/04/garmin-66i-gps-showing-map.jpg
806
1210
Mark
https://nzraw.co.nz/wp-content/uploads/2020/06/nz-raw-logo.png
Mark2022-04-23 16:15:202023-06-28 13:41:39Why I chose a Garmin 66i inReach GPS device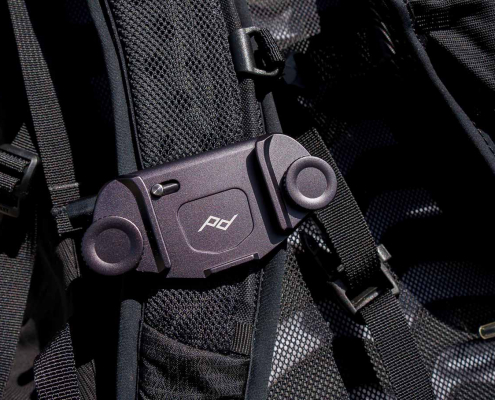 https://nzraw.co.nz/wp-content/uploads/2022/01/review-peak-design-capture-clip-v3.jpg
908
1210
Mark
https://nzraw.co.nz/wp-content/uploads/2020/06/nz-raw-logo.png
Mark2022-01-08 16:08:332022-04-09 08:37:28Peak Design Capture Clip v3 Review
https://nzraw.co.nz/wp-content/uploads/2022/01/review-peak-design-capture-clip-v3.jpg
908
1210
Mark
https://nzraw.co.nz/wp-content/uploads/2020/06/nz-raw-logo.png
Mark2022-01-08 16:08:332022-04-09 08:37:28Peak Design Capture Clip v3 Review https://nzraw.co.nz/wp-content/uploads/2021/11/macpac-rain-covers-on-packs.jpg
1067
1600
Mark
https://nzraw.co.nz/wp-content/uploads/2020/06/nz-raw-logo.png
Mark2021-11-13 18:07:322022-04-09 08:37:40Macpac Waterproof Pack Cover Sizing
https://nzraw.co.nz/wp-content/uploads/2021/11/macpac-rain-covers-on-packs.jpg
1067
1600
Mark
https://nzraw.co.nz/wp-content/uploads/2020/06/nz-raw-logo.png
Mark2021-11-13 18:07:322022-04-09 08:37:40Macpac Waterproof Pack Cover Sizing https://nzraw.co.nz/wp-content/uploads/2021/10/app-for-identifying-peaks.jpg
908
1210
Mark
https://nzraw.co.nz/wp-content/uploads/2020/06/nz-raw-logo.png
Mark2021-10-24 09:24:542022-04-09 08:37:53Identify Peaks with the PeakFinder App
https://nzraw.co.nz/wp-content/uploads/2021/10/app-for-identifying-peaks.jpg
908
1210
Mark
https://nzraw.co.nz/wp-content/uploads/2020/06/nz-raw-logo.png
Mark2021-10-24 09:24:542022-04-09 08:37:53Identify Peaks with the PeakFinder App https://nzraw.co.nz/wp-content/uploads/2021/06/stanley-shortstack-adventure-travel-mug-and-box.jpg
908
1210
Mark
https://nzraw.co.nz/wp-content/uploads/2020/06/nz-raw-logo.png
Mark2021-06-27 17:36:282022-04-09 08:38:03Review of the Stanley Adventure Shortstack Travel Mug 8oz
https://nzraw.co.nz/wp-content/uploads/2021/06/stanley-shortstack-adventure-travel-mug-and-box.jpg
908
1210
Mark
https://nzraw.co.nz/wp-content/uploads/2020/06/nz-raw-logo.png
Mark2021-06-27 17:36:282022-04-09 08:38:03Review of the Stanley Adventure Shortstack Travel Mug 8oz https://nzraw.co.nz/wp-content/uploads/2021/04/LIV_VECTA_SEAT_BAG.jpg
1313
1496
Mark
https://nzraw.co.nz/wp-content/uploads/2020/06/nz-raw-logo.png
Mark2021-04-25 10:59:302022-04-09 08:38:12The Best Small Bike Seat Bag: Liv Vecta
https://nzraw.co.nz/wp-content/uploads/2021/04/LIV_VECTA_SEAT_BAG.jpg
1313
1496
Mark
https://nzraw.co.nz/wp-content/uploads/2020/06/nz-raw-logo.png
Mark2021-04-25 10:59:302022-04-09 08:38:12The Best Small Bike Seat Bag: Liv Vecta https://nzraw.co.nz/wp-content/uploads/2021/01/hydro-flask-trail-series-water-bottles.jpg
825
1100
Mark
https://nzraw.co.nz/wp-content/uploads/2020/06/nz-raw-logo.png
Mark2021-01-15 12:15:372021-05-03 09:01:26Hydro Flask Water Bottle Trail Series Review
https://nzraw.co.nz/wp-content/uploads/2021/01/hydro-flask-trail-series-water-bottles.jpg
825
1100
Mark
https://nzraw.co.nz/wp-content/uploads/2020/06/nz-raw-logo.png
Mark2021-01-15 12:15:372021-05-03 09:01:26Hydro Flask Water Bottle Trail Series Review https://nzraw.co.nz/wp-content/uploads/2020/11/a-route-in-footpath-app.jpg
1199
1600
Mark
https://nzraw.co.nz/wp-content/uploads/2020/06/nz-raw-logo.png
Mark2020-11-23 10:56:252022-04-09 08:38:213 Mapping & Route Planning Apps for Hikers
https://nzraw.co.nz/wp-content/uploads/2020/11/a-route-in-footpath-app.jpg
1199
1600
Mark
https://nzraw.co.nz/wp-content/uploads/2020/06/nz-raw-logo.png
Mark2020-11-23 10:56:252022-04-09 08:38:213 Mapping & Route Planning Apps for Hikers
Leave a Reply
Want to join the discussion?Feel free to contribute!